


You can create a diy paper nativity scene with your kids and enjoy a special holiday tradition. Families and Sunday school groups love the DIY Paper Nativity Scene – Jesus Birth Story Foldable Paper Craft from Closerout. Check out the “Buy Three Get One Free” offer and browse more craft inspiration! 🎨
Key Takeaways
- Creating a DIY paper nativity scene fosters family bonding and spiritual reflection during the holiday season.
- Hands-on crafting helps children learn the nativity story while developing fine motor skills and creativity.
- Using simple materials and templates makes it easy for anyone to create a unique nativity scene that can be cherished for years.
Why Make a DIY Paper Nativity Scene?
Meaning and Tradition
You can create a nativity with your family to celebrate the heart of Christmas. This easy activity for kids brings the nativity story to life in your home or classroom. Many families use nativity crafts to honor spiritual traditions and share the message of hope and unity. When you make a nativity, you show care and dedication, much like artisans who hand-paint each figure. This hands-on approach reflects the reverence for the nativity story and helps you connect with its deeper meaning.
- Artisan craftsmanship shows spiritual dedication and care.
- Multicultural designs highlight the global significance of Christmas.
- Creating and displaying a nativity fosters a connection to heritage and encourages sharing the story of love and hope.
Crafting a nativity scene engages you and your family in a shared activity that mirrors God's creative work. It encourages contemplation and prayer, helping you appreciate the Incarnation. This process slows down the busy season and promotes a sense of expectant waiting for Christ.
Learning Through Craft
Nativity crafts offer more than just decoration. You help children understand the nativity story by letting them build, color, and arrange each figure. This hands-on activity supports learning and spiritual growth.
|
Educational Benefit |
Description |
|---|---|
|
Fine motor development |
Activities like rolling and pinching enhance dexterity. |
|
Story comprehension and sequencing |
Children learn to narrate the nativity story. |
|
Creative expression |
Kids express their ideas through art. |
|
Focused, screen-free play |
Crafting keeps children engaged without screens. |
|
Meaningful discussion and reflection |
You can talk about the nativity and its meaning. |
You can use nativity crafts to teach about Mary, Joseph, Jesus, and the other key figures. Working together on a nativity craft helps children move from just hearing the story to truly understanding it. This makes the nativity a memorable part of your holiday season.
FAQs
Q: Why do people make nativity scenes at Christmas?
A: People create nativity scenes to remember and celebrate the birth of Jesus. This tradition helps families share the Christmas story and its message of love and hope.
Q: How do nativity crafts help children learn?
A: Nativity crafts let children use their hands and creativity. This helps them understand the story, develop fine motor skills, and enjoy meaningful time with family.
Explore more DIY nativity craft kits and Bible story activities for inspiration!
Getting Ready for Your Nativity Scene Craft
Simple Supplies and Tools
You can start your diy nativity set with just a few basic materials. Gather these supplies before you begin:
- White or colored paper (cardstock works best)
- Scissors ✂️
- Glue stick or tape
- Markers, crayons, or colored pencils
- Ruler (for straight lines)
- Sustainable options like toilet paper tubes or recycled cardboard
Tip: Use leftover wrapping paper or old magazines for a unique look and to reduce waste.
Printable Templates and Foldables
Printable templates make your diy nativity set easy and fun. You can find free templates online or use ready-made kits. The DIY Paper Nativity Scene – Jesus Birth Story Foldable Paper Craft from Closerout gives you everything you need in one package. This kit includes foldable figures, a stable, and easy instructions. Take advantage of the “Buy Three Get One Free” offer to share with friends or your Sunday school group.
|
Resource Type |
Where to Find It |
|---|---|
|
Printable templates |
Closerout craft kits, blogs, and Pinterest |
|
Foldable figures |
|
|
Coloring pages |
Setting Up a Kid-Friendly Space
Create a safe and inviting area for crafting. Cover your table with newspaper or a plastic cloth. Place all supplies within easy reach. Make sure scissors and glue are safe for kids. Play Christmas music or read the nativity story as you work. This helps everyone stay focused and enjoy the process.
For more inspiration, check out Bible accessories and craft resources to enrich your holiday experience. 🎄
Step-by-Step DIY Paper Nativity Scene
Creating your own diy paper nativity scene brings the nativity story to life in a hands-on way. You can follow these steps to make each part of your nativity craft unique and meaningful.
Making Main Figures
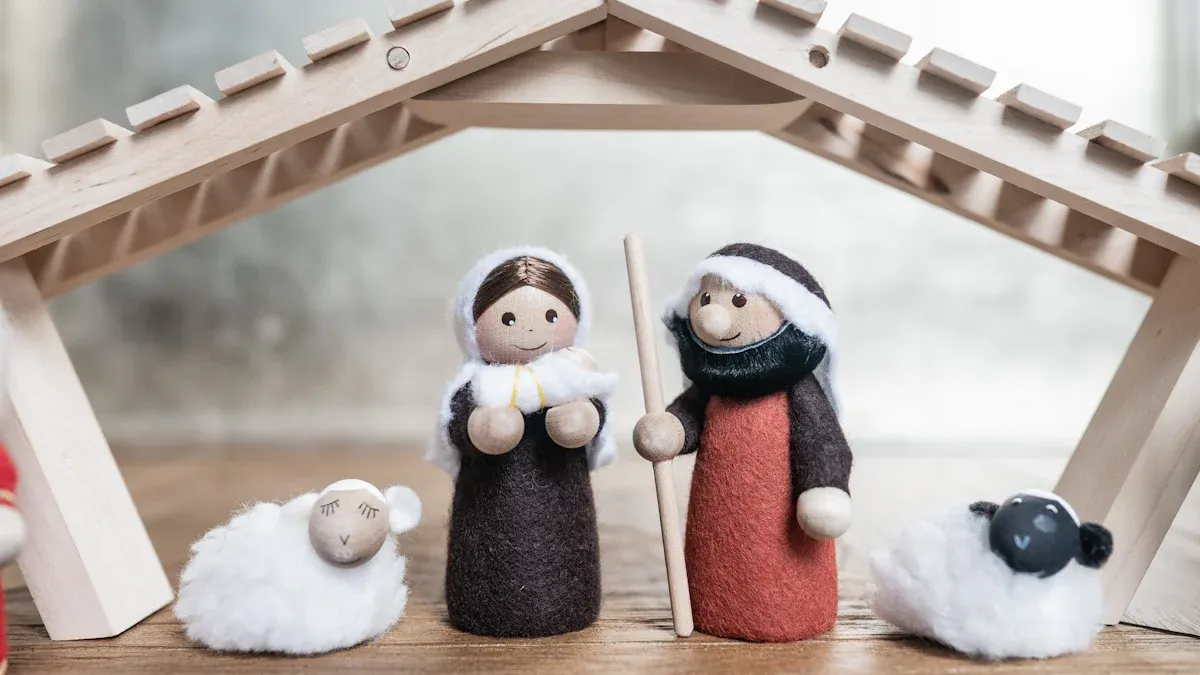
Start by crafting Mary, Joseph, and baby Jesus. These figures form the heart of your diy paper nativity scene.
- Print a free template or use a kit like the DIY Paper Nativity Scene – Jesus Birth Story Foldable Paper Craft.
- Cut out the patterns for each figure. Trace them onto colored paper or use recycled materials for a sustainable touch.
- Use markers to add details. Draw hair for Mary and both hair and a beard for Joseph.
- For Joseph, cut a slit in his headscarf and insert his head, then glue it in place.
- Roll the body cutout into a cylinder and glue the sides together. Attach the head to the top.
- Repeat these steps for Mary, using different colors for her clothing.
- To make baby Jesus, glue small pieces together and place him in a paper manger. Add crumpled paper as hay for a realistic effect.
Tip: You can use toilet paper rolls wrapped in colored paper for a sturdy base. Add felt or fabric scraps for shawls and garments.
This diy nativity scene activity helps you focus on the key characters of the nativity story while encouraging creativity.
Building the Stable and Setting
The stable provides a backdrop for your nativity scene. You can use simple materials to create a cozy setting.
- Use thick cardstock, recycled cardboard, or even a paper plate as the base.
- Fold and glue the stable cutouts along the score lines if you use a template.
- For a rustic look, add small twigs, birch sticks, or pieces of reclaimed wood to the roof and sides.
- Glue the roof in place and let it dry before arranging your figures inside.
A sturdy stable helps your diy paper nativity scene stand out and keeps the figures safe. The natural elements add warmth and texture to your nativity craft.
Adding Animals and Angels
No nativity scene feels complete without animals and angels. These figures add charm and help tell the full nativity story.
- Cut out shapes for sheep, donkeys, and cows from white, brown, or gray paper.
- Use cotton balls for sheep’s wool or draw details with markers.
- Make angels by cutting out wing shapes and gluing them to simple paper cones or cylinders.
- Add halos with gold pipe cleaners or yellow paper strips.
Note: Encourage kids to personalize each animal or angel with their own designs. This makes your diy paper nativity scene even more special.
Tips for Standing Figures
You want your nativity figures to stand tall and stay in place. Here are some helpful tips:
- Roll the body pieces into cylinders and glue the edges for stability.
- Attach small circles of cardboard to the bottom of each figure to create a flat base.
- Use foam dots or double-sided tape to give figures a pop-up effect. This works well for scenes made on paper plates or inside shoeboxes.
- Arrange the figures inside the stable, placing Mary and Joseph near the manger and surrounding them with animals and angels.
Try using a pop-up technique for a 3D effect. Foam dots can lift figures off the background, making your diy paper nativity scene more dynamic.
You can find more creative ideas and templates in the Bible crafts collection and on the Closerout blog. Every diy nativity scene becomes a treasured part of your holiday traditions.
Creative Nativity Scene Craft for Kids
Easy Ideas for Little Hands
You can make a nativity scene craft for kids simple and fun by using hands-on materials. Young children enjoy creating nativity figurines with play dough, felt, paper, or blocks. Try coloring pages or foldables for easy nativity crafts. You can play “I Spy” with the nativity scene and ask questions like, “Who is holding Baby Jesus?” Counting games such as “I count three sheep!” help children learn numbers while exploring the nativity. Hide and seek with the Baby Jesus figurine adds excitement. Singing carols while holding nativity figures connects music and story. Encourage children to care for Baby Jesus by pretending to rock or feed him. These activities make the nativity craft interactive and memorable.
Advanced Touches for Older Kids
Older children can add detail and creativity to their nativity scene craft for kids by using advanced materials and techniques. The table below shows some options:
|
Material/Technique |
Description |
|---|---|
|
Wood |
Gives a classic, rustic look and lasts longer. |
|
Clay & Air-Dry Modeling |
Lets you sculpt detailed nativity figures. |
|
Acrylic or Tempera Paints |
Adds bright color and fine details. |
|
Fabric for Robes |
Makes clothing for figures more realistic. |
|
Dioramas |
Builds a full nativity scene with depth and context. |
|
Clear Acid-Free Spray Varnish |
Protects your nativity craft from dust and moisture. |
|
Essential Tools |
Craft knives, sandpaper, and tweezers help with precision. |
|
Cultural Themes |
Show different cultures in your nativity scene for a unique touch. |
You can use these ideas to make your nativity scene stand out and last for years.
Personalizing Your Scene
You can personalize your nativity scene craft for kids by adding your own artistic touches. Use recycled materials like cardboard or toilet paper tubes for a sustainable nativity. Draw faces, add glitter, or write names on each figure. Create a backdrop with stars or a city skyline. Let each child design their own nativity figure. Display your nativity scene on a shelf or table for everyone to see. Share your finished nativity craft with friends or family. For more inspiration, explore Bible story activities and nativity craft kits to spark new ideas. 🎨
Every nativity scene craft for kids becomes a special keepsake when you add your own creativity and care.
Bible Crafts and Learning Resources
Bible Accessories and Books
You can enrich your nativity craft experience with helpful Bible accessories and inspiring books. Closerout offers a wide range of Bible accessories that make your study time more meaningful. You will find bookmarks, highlighters, and journals that help you reflect on the nativity story. Explore personal growth and learning skills collections for resources that support your spiritual journey. Many families enjoy reading Bible stories together before or after creating a nativity scene. This practice helps you connect the craft to the message behind it.
Featured Products and Guides
You can find many creative guides and products that support Bible-based crafting activities. These projects help you explore stories beyond the nativity and make learning interactive. Here are some popular ideas:
|
Bible Book |
Craft Idea |
Description |
|---|---|---|
|
Jonah |
Whale Craft |
Create a paper plate whale, representing the sea creature that swallowed Jonah. |
|
Matthew |
Parable Puppets |
Make finger puppets featuring characters from Matthew’s parables. |
|
Mark |
Good News Newspaper |
Summarize key events from the Gospel of Mark in a newspaper format. |
|
Luke |
Good Samaritan Art |
Create art inspired by the Good Samaritan story. |
|
John |
Jesus and Nicodemus Craft |
Make a nighttime scene with Jesus and Nicodemus. |
|
Acts |
Pentecost Windsock |
Craft windsocks with flames to represent the Holy Spirit. |
|
Romans |
Armor of God Craft |
Make paper armor pieces representing the “Armor of God.” |
|
1 Corinthians |
Love is Patient Frame |
Decorate frames with “Love is patient, love is kind.” |
|
Psalms |
Shepherd and Sheep |
Create a picture of a shepherd caring for sheep. |
|
Proverbs |
Wisdom Jar |
Decorate jars with Proverbs verses about wisdom. |
You can find more guides and inspiration in the Closerout blog and Bible crafts collection.
Explore More in the Bible Category
Combining Bible crafts with learning resources helps you deepen your understanding of the nativity and other Bible stories. You can:
- Reinforce lessons with interactive and engaging activities.
- Encourage creativity and hands-on participation.
- Involve your whole family, making the nativity experience memorable.
- Use diverse teaching methods, including art, literacy, and sensory play.
- Allow children to learn at their own pace and interest level.
- Mix indoor and outdoor activities for holiday fun.
- Try STEAM projects themed around the nativity.
You can browse the Bible category for more craft kits, books, and accessories. Each resource helps you connect your nativity craft to spiritual growth and joyful learning. 🌟
Extra Ideas and Festive Inspiration
Nativity Ornaments and Garlands
You can turn your nativity figures into festive ornaments or garlands. Punch a small hole at the top of each paper figure and thread a ribbon through it. Hang these ornaments on your Christmas tree or string them across a mantel. Use mini clothespins to attach the figures to a piece of twine for a simple garland. This approach lets you display the nativity story in a new way. Children enjoy seeing their creations become part of your holiday decorations. For more ideas, visit the Closerout Bible crafts collection.
Pop-Up and Card Projects
You can create pop-up nativity scenes or greeting cards. Fold a piece of cardstock in half and cut slits to make standing figures. Glue your nativity characters inside the card so they pop up when opened. Add stars, angels, or a stable in the background. These cards make thoughtful gifts for friends, teachers, or church members. You can also use pop-up techniques to build a 3D nativity scene for your table. Explore more creative projects on the Closerout blog.
Sharing and Community
Share your finished nativity crafts with others. Take photos and post them in the Closerout community or on social media. Invite friends or family to join a virtual craft night. Swap ideas and learn new techniques together. You can inspire others by showing your unique take on the nativity story. Remember to check the blog for more inspiration and connect with other crafters who love Bible-based activities.
Tip: Every nativity project you make can spark joy and bring people together during the holiday season. 🎉
You can celebrate creativity and togetherness by making your own nativity scene. Every project you finish holds unique meaning. Visit the Closerout store for more craft kits, Bible accessories, and books. Share the “Buy Three Get One Free” offer with friends. Start crafting today and create lasting memories! 🎁
FAQ
How do you store your DIY paper nativity scene for next year?
Place your figures in a sturdy box. Add tissue paper between layers. Store in a cool, dry place. This keeps your nativity scene safe and ready for next Christmas! 🎁
Can you use the DIY paper nativity scene for Sunday school lessons?
Yes! You can use your DIY Paper Nativity Scene – Jesus Birth Story Foldable Paper Craft for interactive Bible lessons. Kids learn through hands-on activities and storytelling.


